Tag Archives: Logger

Unix Auditd Authentication Events Analysis and Visualisations with ArcSight Logger

With the free ArcSight Logger L750MB, you can in combination with auditd SmartConnector, gather some useful informations in order to have a better overview on your Unix infrastructure Access Management or to respond to some compliances (ex : PCI-DSS, etc.).

In this blog post we will show some examples on how use ArcSight Logger search engine and visualisation capabilities.

Unix Auditd authentication events analysis

We will first analyse Unix auditd authentication events in order to understand what useful informations we can find.

We assume that login under root account is not allowed and that 500 represent the first usable user account.

We will describe here under different SSH authentication auditd events with they results. You can find in bold some important keywords.

  • Successful SSH authentication auditd events
type=USER_AUTH msg=audit(1316335353.969:348): user pid=32370 uid=0 auid=4294967295 msg='PAM: authentication acct="eromang" : exe="/usr/sbin/sshd" (hostname=macbook.zataz.loc, addr=192.168.178.25, terminal=ssh res=success)'

type=USER_LOGIN msg=audit(1316335353.991:355): user pid=32370 uid=0 auid=500 msg='uid=500: exe="/usr/sbin/sshd" (hostname=macbook.zataz.loc, addr=192.168.178.25, terminal=/dev/pts/0 res=success)'
  • Failed SSH authentication, for a valid user account, auditd events
type=USER_AUTH msg=audit(1316335438.989:362): user pid=32395 uid=0 auid=4294967295 msg='PAM: authentication acct="eromang" : exe="/usr/sbin/sshd" (hostname=macbook.zataz.loc, addr=192.168.178.25, terminal=ssh res=failed)'

type=USER_LOGIN msg=audit(1316335438.990:363): user pid=32395 uid=0 auid=4294967295 msg='acct="eromang": exe="/usr/sbin/sshd" (hostname=macbook.zataz.loc, addr=192.168.178.25, terminal=sshd res=failed)'
  • Failed SSH authentication, for non existing user account, auditd events
type=USER_AUTH msg=audit(1316335506.816:372): user pid=32403 uid=0 auid=4294967295 msg='PAM: authentication acct="?" : exe="/usr/sbin/sshd" (hostname=macbook.zataz.loc, addr=192.168.178.25, terminal=ssh res=failed)'

type=USER_LOGIN msg=audit(1316335506.817:373): user pid=32403 uid=0 auid=4294967295 msg='acct="invaliduser": exe="/usr/sbin/sshd" (hostname=macbook.zataz.loc, addr=192.168.178.25, terminal=sshd res=failed)'
  • Successful TTY authentication auditd events
type=USER_AUTH msg=audit(1316338747.834:381): user pid=2678 uid=0 auid=4294967295 msg='PAM: authentication acct="eromang" : exe="/bin/login" (hostname=?, addr=?, terminal=tty1 res=success)'

type=USER_LOGIN msg=audit(1316338747.867:437): user pid=2678 uid=0 auid=500 msg='op=login id=500 exe="/bin/login" (hostname=?, addr=?, terminal=tty1 res=success)'
  • Failed TTY authentication, for a valid user account, auditd events
type=USER_AUTH msg=audit(1316338880.990:495): user pid=32452 uid=0 auid=4294967295 msg='PAM: authentication acct="eromang" : exe="/bin/login" (hostname=?, addr=?, terminal=tty1 res=failed)'

type=USER_LOGIN msg=audit(1316338880.990:496): user pid=32452 uid=0 auid=4294967295 msg='op=login id=500 exe="/bin/login" (hostname=?, addr=?, terminal=tty1 res=failed)'
  • Failed TTY authentication, for non existing user account, auditd events
type=USER_AUTH msg=audit(1316338916.360:497): user pid=32452 uid=0 auid=4294967295 msg='PAM: authentication acct="?" : exe="/bin/login" (hostname=?, addr=?, terminal=tty1 res=failed)'

type=USER_LOGIN msg=audit(1316338916.360:498): user pid=32452 uid=0 auid=4294967295 msg='op=login acct="invaliduser" exe="/bin/login" (hostname=?, addr=?, terminal=tty1 res=failed)'

For USER_LOGIN auditd type events you will have these results :

  • Count of successful and failed authentication attempts (number of lines in the log).
  • Targeted username through auditd “acct” value, but only for failed attempts.
  • Targeted UID for successful and failed attempts through auditd “uid“, “id” and “auid” values.
  • Targeted device address and hostname (box hosting the auditd.log file, or IP/hostname present in SYSLOG log file).
  • Source address and hostname, only for remote authentication, through auditd “hostname” and “addr” values.
  • Associated terminal through “terminal” value.

FOR USER_AUTH type you will have these results :

  • Count of successful and failed authentication attempts (number of lines in the log).
  • Targeted user name through auditd “acct” value, but only valid user accounts.
  • Targeted device address and hostname (box hosting the auditd.log file, or IP/hostname present in SYSLOG log file).
  • Source address and hostname,  only for remote authentication, through auditd “hostname” and “addr” values.
  • Associated terminal through “terminal” value.

In order to provide Access Management analysis, we will focus on USER_AUTH type. With this type we can detect regular authentications and authentication brute force attacks on valid users, with valid user name display, “acct” value.

Unix Auditd authentication events searches in ArcSight Logger

On ArcSight Logger we can now play with searches in order to retrieve and analyse auditd authentication events.

The following filter will provide you all Unix auditd events.

deviceVendor = "Unix" AND deviceProduct = "auditd"

The following filter will provide you all auditd USER_AUTH type events.

deviceVendor = "Unix" AND deviceProduct = "auditd" AND deviceEventCategory = "USER_AUTH"

In order to analyse Access Management activities, we need to understand how the SmartConnector is categorizing the auditd USER_AUTH event and gather the most important fields.

  • baseEventCount : The number of occurrence of the event if aggregation is active on the SmartConnector.
  • deviceAddress : Targeted device address
  • deviceHostName : Targeted device hostname.
  • sourceAddress : The attacker address.
  • sourceHostName : The attacker hostname, if available.
  • sourceUserName : The targeted authentication username.
  • destinationProcessName : Targeted process name. “/usr/sbin/sshd” for SSH or “/bin/login” for TTY console in our cases.
  • deviceCustomString3 : The authentication result. “success” or “failed” in our cases.
  • deviceCustomString6 : For the associated terminal or tty. “ssh” or “ttyx” in our cases.
  • deviceReceiptTime : The event associated timestamp.

In the following scenario, the target was under SSH brute force attack, and the attacker has gain access to the box. We will conduct an analysis, provide you some useful search queries and operators, and try to demonstrate you that using ArcSight Logger for forensics analysis is quiet easy.

This search query is based on the last 24 hours, and we can directly see through the Logger radar that a lot of USER_AUTH requests have been made. In order to only focus on the specific fields, we will execute the following query.

deviceVendor = "Unix" AND deviceProduct = "auditd" AND deviceEventCategory = "USER_AUTH"  | cef deviceAddress deviceHostName sourceAddress sourceHostName sourceUserName destinationProcessName deviceCustomString3 deviceCustomString6 deviceReceiptTime baseEventCount

cef” search operator will extracts values for specified fields from matching CEF events. To view only the extracted values, select “User Defined Fieldsets” in the search drill down menu. “cef” search operator will also allow you to use other search operators such as “sort“, “chart“, etc.

To focus on failed authentication attempts, execute the following query.

deviceVendor = "Unix" AND deviceProduct = "auditd" AND deviceEventCategory = "USER_AUTH"  AND deviceCustomString3 = "failed" | cef deviceAddress deviceHostName sourceAddress sourceHostName sourceUserName destinationProcessName deviceCustomString6 deviceReceiptTime  baseEventCount

To focus on successful authentication, execute the following query.

deviceVendor = "Unix" AND deviceProduct = "auditd" AND deviceEventCategory = "USER_AUTH"  AND deviceCustomString3 = "success" | cef deviceAddress deviceHostName sourceAddress sourceHostName sourceUserName destinationProcessName deviceCustomString6 deviceReceiptTime  baseEventCount

Browsing in the events is a quiet boring, ArcSight Logger provide you a query operator how will permit you to create visualisations with your search results.

  • Chart creation to count sourceUserName occurrences

Don’t forget that USER_AUTH auditd type don’t provide the targeted user name for non existing users, so we will only focus on existing sourceUserName.

deviceVendor = "Unix" AND deviceProduct = "auditd" AND deviceEventCategory = "USER_AUTH" AND sourceUserName IS NOT NULL | cef deviceAddress deviceHostName sourceAddress sourceHostName sourceUserName destinationProcessName deviceCustomString3 deviceCustomString6 deviceReceiptTime  baseEventCount | chart sum(baseEventCount) AS Total by sourceUserName

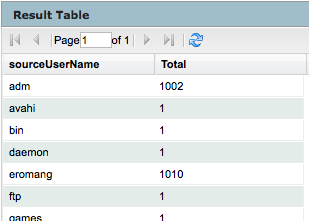
Associated to the result chart, you will also have a result table.

You can also, change the type of chart, by clicking on the upper right corner icon of the result chart frame. The available chart type are column, bar, pie, area, line, stacked column or stacked bar.

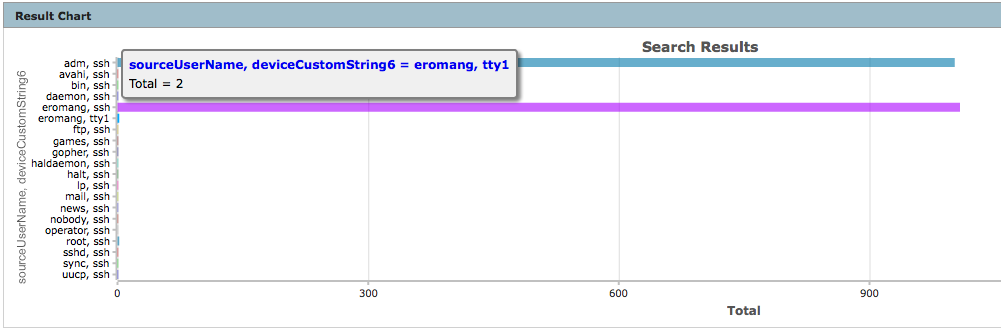
  • Chart creation to count Terminal occurences
deviceVendor = "Unix" AND deviceProduct = "auditd" AND deviceEventCategory = "USER_AUTH" AND sourceUserName IS NOT NULL | cef deviceAddress deviceHostName sourceAddress sourceHostName sourceUserName destinationProcessName deviceCustomString3 deviceCustomString6 deviceReceiptTime  baseEventCount | chart sum(baseEventCount) AS Total by deviceCustomString6

We can see that majority of the authentications are through SSH and that some are through TTY.

  • Chart creation to count sourceUserName and Terminal occurences
deviceVendor = "Unix" AND deviceProduct = "auditd" AND deviceEventCategory = "USER_AUTH" AND sourceUserName IS NOT NULL | cef deviceAddress deviceHostName sourceAddress sourceHostName sourceUserName destinationProcessName deviceCustomString3 deviceCustomString6 deviceReceiptTime  baseEventCount | chart sum(baseEventCount) AS Total by sourceUserName deviceCustomString6

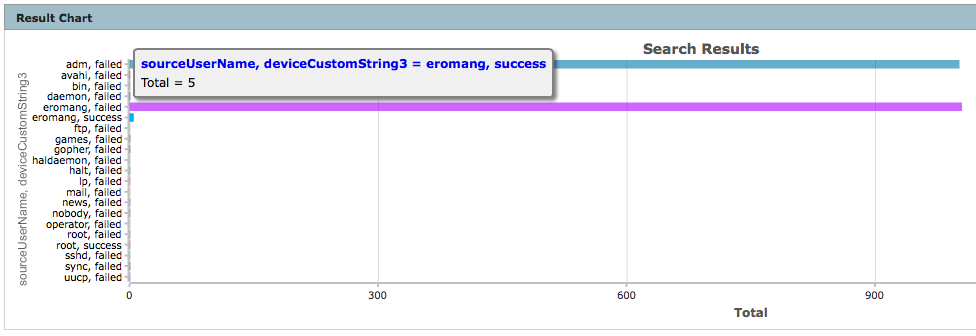
  • Chart creation to count sourceUserName and authentication occurences
deviceVendor = "Unix" AND deviceProduct = "auditd" AND deviceEventCategory = "USER_AUTH" AND sourceUserName IS NOT NULL | cef deviceAddress deviceHostName sourceAddress sourceHostName sourceUserName destinationProcessName deviceCustomString3 deviceCustomString6 deviceReceiptTime  baseEventCount | chart sum(baseEventCount) AS Total by sourceUserName deviceCustomString3

We can see that only user name “eromang” has successful login.

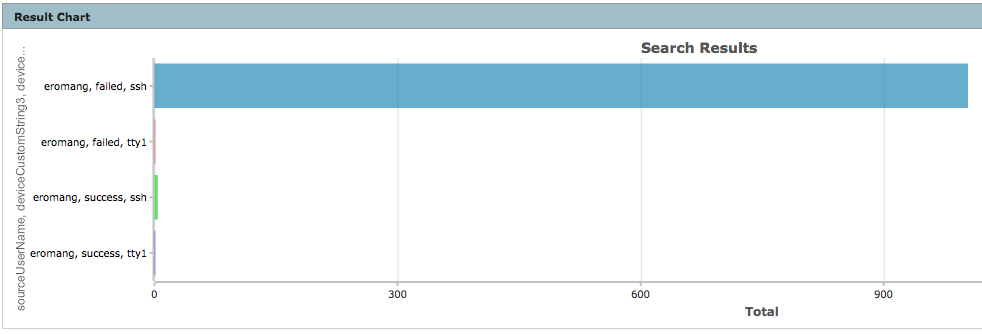
  • Chart creation to count sourceUserName “eromang“, authentication and Terminal occurences
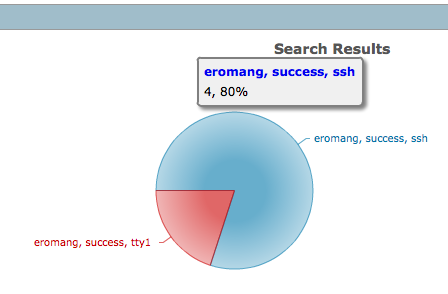
deviceVendor = "Unix" AND deviceProduct = "auditd" AND deviceEventCategory = "USER_AUTH" AND sourceUserName = "eromang" | cef deviceAddress deviceHostName sourceAddress sourceHostName sourceUserName destinationProcessName deviceCustomString3 deviceCustomString6 deviceReceiptTime  baseEventCount | chart sum(baseEventCount) AS Total by sourceUserName deviceCustomString3 deviceCustomString6

We can discover that user name “eromang” has successful login through “ssh” and “tty” terminals.

  • Chart creation to count sourceUserName “eromang” and successful authentication occurences
deviceVendor = "Unix" AND deviceProduct = "auditd" AND deviceEventCategory = "USER_AUTH" AND sourceUserName = "eromang" AND deviceCustomString3 = "success" | cef deviceAddress deviceHostName sourceAddress sourceHostName sourceUserName destinationProcessName deviceCustomString3 deviceCustomString6 deviceReceiptTime  baseEventCount | chart sum(baseEventCount) AS Total by sourceUserName deviceCustomString3 deviceCustomString6

  • Char creation to count sourceUserName “eromang”, successful “ssh” authentication and sourceAddress occurences
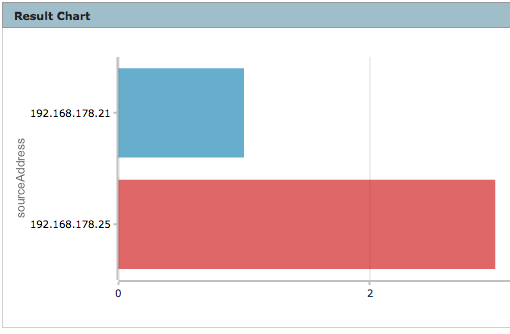
deviceVendor = "Unix" AND deviceProduct = "auditd" AND deviceEventCategory = "USER_AUTH" AND sourceUserName = "eromang" AND deviceCustomString3 = "success" AND deviceCustomString6 = "ssh" | cef deviceAddress deviceHostName sourceAddress sourceHostName sourceUserName destinationProcessName deviceCustomString3 deviceCustomString6 deviceReceiptTime  baseEventCount | chart sum(baseEventCount) AS Total by sourceAddress

We can discover two different source IP addresses.

  • Chart creation to count “ssh” authentications for both sourceAddress occurences
deviceVendor = "Unix" AND deviceProduct = "auditd" AND deviceEventCategory = "USER_AUTH"  AND (sourceAddress = "192.168.178.25" OR sourceAddress = "192.168.178.21")  AND sourceUserName = "eromang" AND deviceCustomString6 = "ssh"
| cef deviceAddress deviceHostName sourceAddress sourceHostName sourceUserName destinationProcessName deviceCustomString3 deviceCustomString6 deviceReceiptTime  baseEventCount | chart sum(baseEventCount) AS Total by deviceCustomString3 sourceAddress

We can discover that sourceAddress “192.168.178.21” has hundreds of failed login and one successful login.

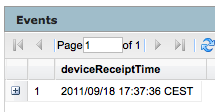
  • Query to find the exact time sourceAddress has breach the target
deviceVendor = "Unix" AND deviceProduct = "auditd" AND deviceEventCategory = "USER_AUTH"  AND sourceAddress = "192.168.178.21" AND sourceUserName = "eromang" AND deviceCustomString6 = "ssh" AND deviceCustomString3 = "success" | cef deviceReceiptTime

As you can see by this example, ArcSight Logger has some powerful search engine queries and visualisation outputs how will help you to do forensics investigations for your assets.

ArcSight Logger File Receiver Configuration

ArcSight Logger propose different kind of receivers :

  • UDP receiver for UDP messages, such as SYSLOG.
  • TCP receiver for TCP messages, such as SYSLOG how can also be sent with TCP.
  • CEF UDP receiver for CEF (Common Event Format) messages sent through UDP.
  • CEF TCP receiver for CEF (Common Event Format) messages sent through TCP.
  • SmartMessage receiver for encrypted SmartMessage messages sent by SmartConnectors.
  • File Transfer to read remote logs using scp, sftp or ftp.
  • File Receiver to read logs from a local or remote file system such as NFS, CIFS or SAN.

In my previous blog posts, we configured SmartConnectors to send they’re messages to the Logger SmartMessage receiver. The SmartMessage reception method is the most used in an typical ArcSight Log Management infrastructure. With SmartConnectors and SmartMessage receiver usage you can benefit of :

  • SmartConnector normalization, categorization, aggregation, batching and filtering.
  • SmartMessage encrypted transmission of messages.

But it could happen that you need to collect events without SmartConnector or FlexConnector. For examples, maybe you have an existing network file system (NFS) to centralize all your Apache HTTP Server logs files, or maybe you are not allowed to install SmartConnector on a system and the policy doesn’t allow to send messages through UDP. File Receiver Logger receivers will provide you alternatives in order to still collect the events.
File Receiver Configuration

ArcSight Logger File Receiver allow you to read files from a network file system (NFS) CIFS, or storage area network (SAN). But the free ArcSight Logger L750MB only allow you File Receiver through a local share. So the ArcSight Logger L750MB processes, how are running under “arcsight” user and group should have the permissions to read and/or write into this share.

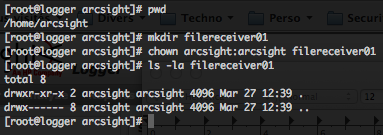
In order to setup a File Receiver for ArcSight Logger L750MB, first create a “filereceiver01” folder in “$ARCSIGHT_HOME“. Or you can mount a NFS, CIFS or SAN on the Logger filesystem.

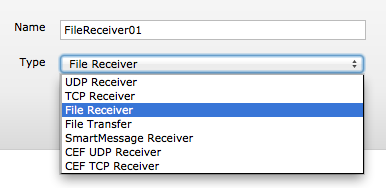
Then log into the Logger Web interface and go into “Configuration -> Event Inpout/Output“. Click on the “Add” button, give a name to your File Receiver (for example: FileReceiver01), select “File Receiver” in the pull-down list and click on the “Next” button.

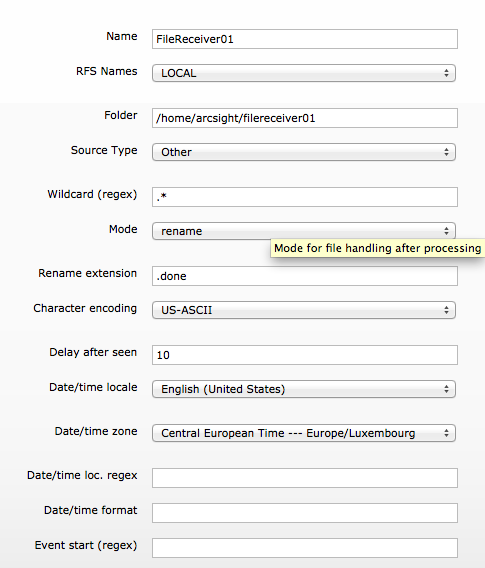
To complete the setup specify the following information’s :

  • RFS Names : On a L750MB Logger you can only select “LOCAL“, but on a appliance Logger you can select the previously declared NFS, CIFS or SAN share.
  • Folder : Specify the folder name, in our example “/home/arcsight/filereceiver01“.
  • Source Type : Select from the pull-down list your log file types. “Microsoft DHCP Log“, “Juniper Steel-Belted Radius“, “Apache HTTP Server Error“, “Apache HTTP Server Access“, “IBM DB2 Audit” or “Other“. The “Other” choice will allow you to import all kind of logs.
  • Wildcard (regex) : Allow you through regular expressions to describe the log file to read. “.*” mean all files.
  • Mode : Select from the pull-down list. With “Persist” mode, the Logger will remember which files have been processed and only processes them once. With “Rename” mode will rename the log file once it has been processed. With “Delete” mode, the file is deleted once it has been processed.
  • Rename extension : If you have select the “Rename” mode, specify the suffix to append to the log files. By default “.done“.
  • Character encoding : Select the log file character encoding.
  • Delay after seen : Specify the number of seconds to wait after a source file is first seen until it is processed. This allows the entire file to be copied before processing begins. By default “10” seconds.
  • Date/time locale : Select from the pull-down list your locale.
  • Date/time zone : Select from the pull-down list your time zone, if no time zone is specified into the log file. By default, the time zone is the Logger time zone.
  • Date/time loc. regex : Allow you through regular expressions to describe which characters represent the timestamps in the log file. By default no timestamp in the log file.
  • Date/time format : If timestamps are present in the log file, specify the format of the timestamps through format specifiers. By default no timestamps in the log file.
  • Event start (regex) : If you’re log files are multi-line, you can specify a regular expression how describe the start of a new event in the log file. By default, each line in the log file is considered as a single event.

Then save your configuration. You will have to active the File Receiver by clicking on the right button.

Directly after activating the File Receiver a Device will be created into “Configuration -> Devices“. In order to search easily on the File Receiver events, I recommend you to create a dedicated Device Group (ex : FileReceiver), from “Configuration -> Devices -> Device Groups“, and to associated the newly created File Receiver with this new Device Group.

Also I recommend you, to dedicate a Storage Group (ex : File Receivers) to all events coming from the File Receivers, from “Configuration -> Storage -> Storage Groups“. You can rename on existing Storage Group and adapt the associated retention period and maximum size.

Associate the created Device Group with the renamed Storage Group by Storage Rules, from “Configuration -> Storage -> Storage Rules).

Finally you have to restart the File Receiver by clicking twice on the right button. If you don’t restart the receiver, the Device and Storage Groups associated with the receiver are not active.

Retrieving events from File Receiver

If you have create dedicated Device Groups and/or Storage Groups for both File Receiver, you will be able to easily find the associated events through the Logger search engine.

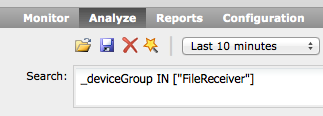
For searches on Device Groups, just type the following command, where “FileReceiver” is you Device Group.

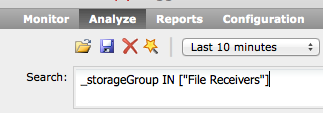
For searches on Storage Groups, just type the following command, where “File Receivers” is your Storage Group.

You can also mix all these search parameters.

Receivers Debugging

All activities related to the Logger Receivers are located in the “/home/arcsight/current/arcsight/logger/logs/logger_receiver.log” log file.

receiver_https” is corresponding to the SmartMessage Receiver, and “rfs_file_receiver” to the newly added File Receiver.

Eps(SLC)” is corresponding to the current EPS rate, “Total Events” is the total number of events the receiver has processed since the last restart, “Eps(max)” the maximum EPS rate the receiver has processed since the last restart, “Bps(SLC)” the bytes per second the receiver has processed.

ArcSight Logger L750MB now for free !

Good news for the Log Management market, ArcSight is now offering his downloadable software Logger L750MB version for free ! You don’t have to pay 49$ per year to install and fully use this Log Management solution. You can download this version from ArcSight website, but downloadable version can only be downloaded from the following countries: Australia, Belgium, Canada, Denmark, Finland, France, Germany, Hong Kong, India, Israel, Italy, Kuwait, Malaysia, Netherlands, Norway, Poland, Russia, Saudi Arabia, Singapore, South Africa, Spain, Sweden, Taiwan, Thailand, Turkey, United Arab Emirates, United Kingdom and United States.

If you want to install and play with ArcSight Logger L750MB, I have write some blogposts to help you :

ArcSight Cisco IOS SmartConnector installation with Dynamips and Dynagen

In my previous blob posts I have explain on how to install ArcSight Logger L750MB, how to setup a Windows Snare SmartConnector, some useful ArcSight SmartConnector commands and on how to backup your Logger configurations. This new blog post will explain you on how to setup a Cisco lab with Dynamips and Dynagen and how to setup an ArcSight Cisco IOS SmartConnector. The ArcSight Cisco IOS SmartConnector supports 2600 series and above with IOS 11.3, 12.4, 15.0, and 15.1.

Dynamips and Dynagen lab setup

First of all my lab is running under Ubuntu 10.04.2 LTS. Dynamips is a Cisco router emulator, but he can also emulate switches and Cisco PIX/ASA. Dynagen is a front-end for Dynamips. “Dynagen takes care of specifying the right port adapters, generating and matching up those pesky NIO descriptors, specifying bridges, frame-relay, ATM switches, etc. It also provides a management CLI for listing devices, suspending and reloading instances, determining and managing idle-pc values, performing packet captures, etc.”.

You have to create a “dynamics” folder into your “/opt” directory.

Download the latest Dynagen version and uncompress the archive in the “dynamips” folder. My lab Dynagen version is 0.9.1 and this specific version require at least version 0.2.8-RC1 of Dynamics. Download version 0.2.8-RC1 of Dynamics and use the “chmod 755” command to make the Dynamips binary executable.

Create symbolic links, in “/usr/sbin” for the Dynagen and Dynamips programs.

cd /usr/sbin
ln -s /opt/dynamips/dynagen-0.11.0/dynagen dynagen
ln -s /opt/dynamips/dynamips-0.2.8-RC1-x86.bin dynamips

Create a directory for Cisco IOS images.

Download you Cisco IOS images into the “images” directory. To find Cisco IOS images you can use some Google dorks.

For 7200 search with intitle:index.of c7200*.bin -site:cisco.comTry

For 3660 search with intitle:index.of c3660*.bin -site:cisco.comTry

For PIX search with intitle:index.of cisco pix*.bin -site:cisco.comTry

For my lab I have use the “c7200-adventerprisek9-mz.124-4.T1.bin” IOS image. You will maybe need to uncompress the IOS image archive.

Then create a “lab_router.net” file into “/opt/dynamips/dynagen-0.11.0/sample_labs” directory. Here under my “lab_router.net” configuration.

[localhost]
[[7200]]
ram=256
image = /opt/dynamips/images/c7200-adventerprisek9-mz.124-4.T1.bin
nep = npe-400
[[router R1]]
model = 7200
f0/0 = NIO_tap:tap0
f1/0 = NIO_gen_eth:eth0

Maybe you have to adapt your IOS image file path.

Now you have to create a TUN/TAP interface on your Linux box.

Install “uml-utilities” package.

Load the TUN/TAP driver into the kernel.

Create a TUN/TAP interface by invoking the “tunctl” command. Enable the “tap0” interface and configure an IP address for it.

Remove your existing “eth0” interface configuration with the following command.

Add a default route that points to the router interface connected to the “tap0” interface.

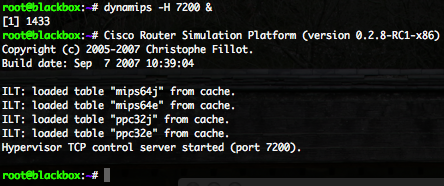
Now start the dynamics process with the following command. Not that the “&” character instruct the process to run in the background.

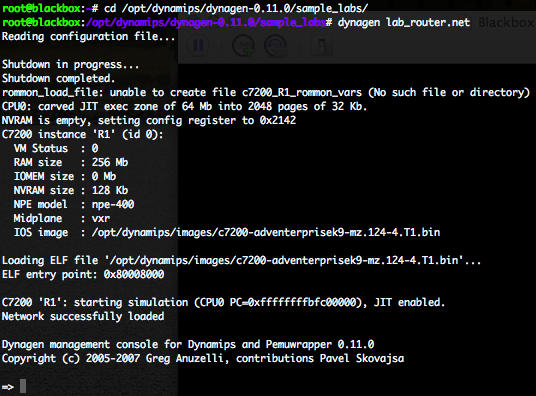
Use the “dynagen” command to process the “lab_router.net” configuration file and start the virtual network.

The Dynagen “list” command will permit you to list the network equipment and the the TCP port for console access.

Connect you with telnet on “localhost” port “2000” to get access to the router.

On the first router configuration question response “no“.

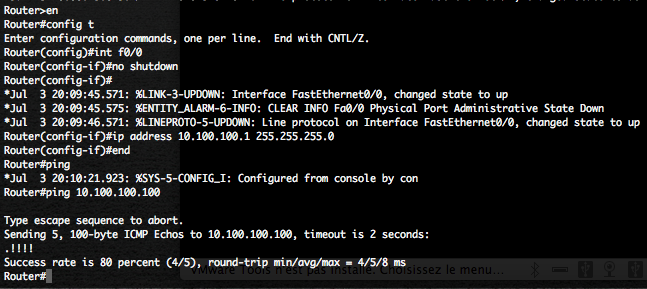
Perform the following tasks on the router, to configure the “f0/0” router interface how is mapped to the TUN/TAP “tap0” interface.

  • Enter in configuration mode.
  • Enable the “f0/0” interface
  • Provide an IP address for this interface
  • Try to ping the “tap0” interface

Now provide Cisco passwords.

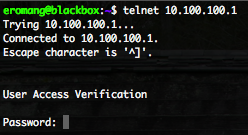
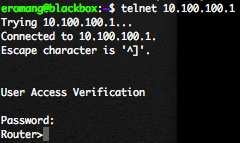
At this point you can connect you, with telnet, from the Linux box to the Cisco router directly on IP 10.100.100.1.

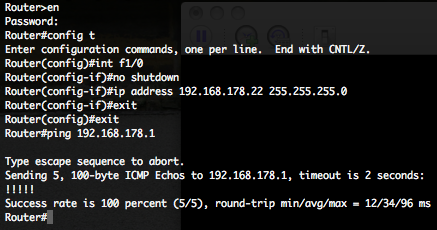
Perform the following tasks on the router, to finish our router configuration to have the possibility to communicate with external world.

  • Enter in configuration mode.
  • Enable the “f1/0” interface
  • Provide an IP address for this interface, here 192.168.178.22.
  • Try to ping the default gateway for 192.168.178.0/24 network, here 192.168.178.1.

Your Cisco router is now able to communicate with outside world.

ArcSight Cisco IOS SmartConnector installation and setup

If you have an existing Syslog UDP daemon, for example the SmartConnector configured in the Snare Windows blog post, you don’t need to follow the installation and setup. ArcSight Cisco IOS SmartConnector is considered as a “sub connector” for Syslog SmartConnector. All Cisco IOS messages how will be received by the Syslog UDP daemon are recognized coming from a Cisco IOS, but the same Syslog UDP daemon can also receive Windows Snare, Snort, Juniper NSM, JunOS, Red Hat Linux Audit messages. Cisco IOS Syslog message will be converted into SmartMessage (CEF) format.

First verify that you don’t have any existing Syslog UDP daemon how is running on the box, you can use “netstat -uan” to verify this.

Upload the “ArcSight-5.0.2.5703.0-Connector-Downloadable-Logger-Linux.bin” binary available from the ArcSight Download Center, and use the “chmod 755” command to make the binary executable.

Execute the binary in order to install the SmartConnector.

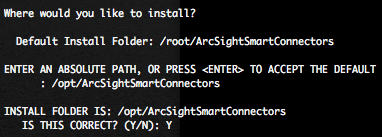
Press “Enter” twice times, provide the installation directory, in our case “/opt/ArcSightSmartConnectors” and confirm the installation.

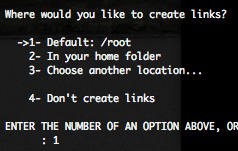
We recommend you to create a links in order to remove the SmartConnector.

Once the SmartConnector installed you need to configure him.

Select the destination type that you want to configure for this SmartConnector, in our case it will be the L750MB Logger.

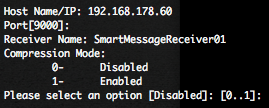
Provide the hostname or IP address of the Logger, the destination port (for Logger software version the port is 9000/TCP), and the Receiver Name (available in the Configuration -> Event Input / Output menu of the Logger).

Select “Syslog Daemon(syslog)” as SmartConnector to install, don’t change the network IP, port and protocol (514/UDP).

Provide a SmartConnector name, don’t forget that the SmartConnector could also receive Syslog messages from other devices than Cisco IOS.

Select if you want to install the SmartConnector as a service or as a standalone application, in our case we will stay in standalone mode.

Now you have to start the SmartConnector by executing the following commands.

The SmartConnector is waiting for messages and is running (ET=Up, HT=Up).

Configure Cisco IOS for event collection

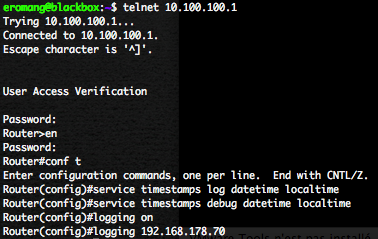
Log again on the Cisco router with telnet.

Execute the following steps to enable Cisco IOS event collection.

  • Enter in enable mode.
  • Enter in configuration mode.
  • Enable Time-Stamps on Log Message
  • Enable System Message Loggin
  • Set the Syslog Destination, in our case the Syslog UDP daemon SmartConnector.

In your ArcSight SmartConnector console, you will see that the first Cisco vendor and CiscoRouter product message has been received by the SmartConnector.

Also if you check the “/opt/ArcSightSmartConnectors/current/logs/agent.log” log file, you will see these messages.

[2011-07-03 21:20:33,717][INFO ][default.com.arcsight.agent.loadable._EventCounter][processSingleAlert] First event from [CISCO|CiscoRouter||192.168.178.22] received.

[2011-07-03 21:20:38,033][INFO ][default.com.arcsight.common.eb.a][processSingleAlert] Succesfully loaded categorization file [cisco/ciscorouter_xr.csv]

[2011-07-03 21:20:45,419][INFO ][default.com.arcsight.agent.loadable._DeviceEventCounter][processSingleAlert] New device found [|192.168.178.22|CISCO|CiscoRouter]. Starting counters.

In your Logger you will see all Cisco events.