Category Archives: Metasploit

All my posts regarding Metasploit framework, auxiliaries, plugins and exploits.

Metasploit Nessus bridge plugin unleashed – Part 2

The Metasploit Team has release a new plugin, a bridge between Metasploit and Nessus. This new plugin is a collaboration between HD Moore, James Lee, Zate Berg, darkoperator and the Nessus Team. If you follow the PaulDotCompodcast, you know that Paul is a employe of the Nessus team and that darkoperator (aka Carlos Perez) is an official developer of the Metasploit project. A good collaboration between the 2 teams how has uncorked on this new important step in Metasploit.

In the first par of the post serie, we have describe all the generic, user and policy command. In this new post we will describe the plugin, scan, report and “nessus_find_targets” commands.

Plugin Commands

  • Getting a list of plugins by family – nessus_plugin_list :

If you are an admin user or a normal user, by typing this command you will have a list of plugins by family.
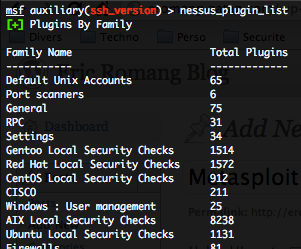
Nessus plugins by family
  • Getting the detail of a family of plugins – nessus_plugin_family :

If you wish to have the detail of a plugin family, just type the following command :
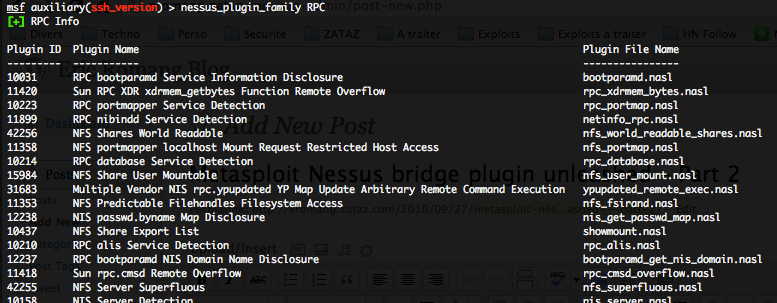
Nessus plugin family detail
  • Getting details on a specific plugin of a family – nessus_plugin_details :

To get details on a specific plugin of a family of plugin, you have to precise the plugin file name listed with the previous “nessus_plugin_family” command.
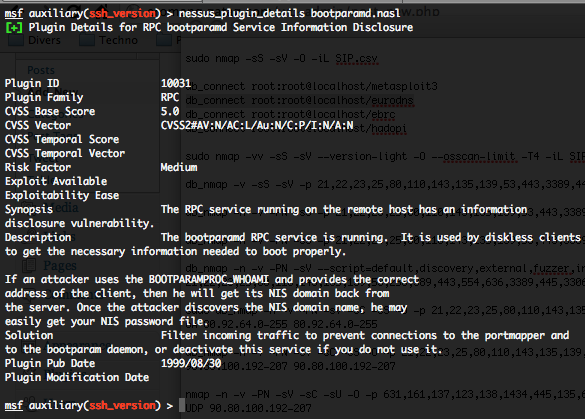
Nessus plugin detail
  • Details of Nessus plugins preferences – nessus_plugin_prefs :

To get details of all Nessus plugins preferences, just type the following command :

nessus_plugin_prefs

Scan Commands

  • Starting a new Nessus scan – nessus_scan_new :

To start a new Nessus scan run the following command :

nessus_scan_new <policy id> <scan name> <targets>

Where “policy id” is the unique ID of the policy to be used, “scan name” the name of the scan and “targets” the targeted hostnames or IP addresses.

Starting a new Nessus scan
  • List of all current Nessus scans – nessus_scan_status :

To get a list of all current Nessus scans, run the following command :

List of all current Nessus scans
  • Pausing a running Nessus scan – nessus_scan_pause :

To pause a running Nessus scan run the following command :

nessus_scan_pause <scan id>

Where “scan id” is the unique ID of the Nessus scan how is available by the previous command “nessus_scan_status“.

Nessus scan pause
Nessus scan pause

To pause all running Nessus scans, just run the following command :

nessus_scan_pause_all

  • Resuming a paused Nessus scan – nessus_scan_resume :

To resume a Nessus scan run the following command :

nessus_scan_resume <scan id>

Where “scan id” is the unique ID of the Nessus scan how is available by the command “nessus_scan_status“.

Nessus scan resume
Nessus scan resume

To resume all paused Nessus scans, just run the following command :

nessus_scan_resume_all

  • Stopping a Nessus scan – nessus_scan_stop :

To stop a Nessus scan, run the following command :

nessus_scan_stop <scan id>

Where “scan id” is the unique ID of the Nessus scan how is available by the command “nessus_scan_status“.

Stopping a Nessus scan

To stop all the Nessus scan, just type the following command :

nessus_scan_stop_all

In the following post we will describe the reports and the “nessus_find_targets” commands.

Metasploit Nessus bridge plugin unleashed – Part 1

The Metasploit Team has release a new plugin, a bridge between Metasploit and Nessus. This new plugin is a collaboration between HD Moore, James Lee, Zate Berg, darkoperator and the Nessus Team. If you follow the PaulDotCom podcast, you know that Paul is a employe of the Nessus team and that darkoperator (aka Carlos Perez) is an official developer of the Metasploit project. A good collaboration between the 2 teams how has uncorked on this new important step in Metasploit.

To activate the Nessus bridge plugin, just update you Metasploit installation to the latest revision and log in the Metasploit console. The pre-requirements are that you need to have a running Nessus 4.2.x installation with a valid user account.

  • Loading the nessus plugin
Loading the Nessus plugin

Generic commands

  • Getting help – nessus_help :

To have an overview of all the Metasploit Nessus bridge plugin commands, just type :

msf auxiliary(ssh_version) > nessus_help

Or to have a specific command help, just type :

nessus_help <command>

  • Connecting to Nessus – nessus_connect :

To connect to Nessus, just type :

nessus_connect login:password@nessusd_ip:port <ssl ok>

login” and “password” variables are you’re Nessus user login and password. “nessusd_ip” variable is the IP address or the hostname of Nessusd. “port” variable is the port where Nessusd is listening, by default 8834/tcp. “ok” variable is for letting you know that nessus use a self signed certificate and that risks are present.

Connecting to Nessus
  • Saving your connexion configuration – nessus_save :

To save your connexion configuration just run the nessus_save command, a nessus.yaml file will be created into you $HOME/.msf3 directory. You don’t need anymore to provide the nessus_connect variables.

  • Logout from nessus – nessus_logout :

To disconnect from Nessus, just run the following command :

Nessus logout
Nessus logout
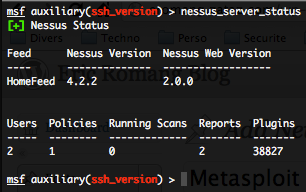
  • Checking Nessus status – nessus_server_status :

To check the Nessus version, the feed version, the Nessus Web version, the total number of users, policies, running scans, reports and plugging, run the following command :

Nessus status check
Nessus status check
  • Checking the current Nessus user privileges – nessus_admin :

If the Nessus user used is an admin, the following result is displayed

Nessus admin user check

If the Nessus user used is not an admin, the following result is displayed

Nessus normal user check
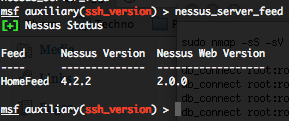
  • Checking the Nessusd Feed type – nessus_server_feed :

To check the Nessus version, the feed version and the Nessus Web version, run the following command :

Nessus Feed check
Nessus Feed check

User Commands

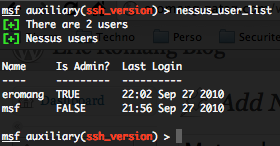
  • List of all Nessus users – nessus_user_list :

If you are an admin, you will be able to list all the Nessus users, they’re login, user rights (admin or not), and they’re last login dates.

Nessus users list
Nessus users list
  • Adding a Nessus user – nessus_user_add :

If you are an admin, you will be able to add a normal Nessus user by typing the following command :

nessus_user_add <username> <password>

Adding a Nessus user
  • Deleting a Nessus user – nessus_user_del :

If you are an admin, you will be able to delete a normal, or an admin, Nessus user.

Deleting a Nessus user
  • Changing a Nessus user password – nessus_user_passwd :

If you are an admin, you will be able to change the password of admin, and non admin, Nessus users.

Nessus user password change

Policy commands

You still need to first create your policy in Nessus between the Nessus Client or Web Interface.

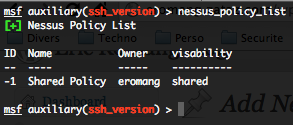
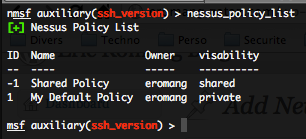
  • Listing of all Nessus policies – nessus_policy_list :

If you are a normal Nessus user, you will only be able to see the “Shared” Nessus policies.

Shared policies for normal Nessus user

But if you are an admin user, you will be able to see the “Shared” and “Private” Nessus policies.

Nessus shared and private policies for Nessus admin user
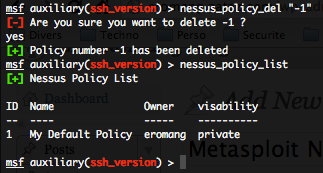
  • Deleting a policy – nessus_policy_del :

If you are an admin, you will be able to delete a policy.

Nessus policy deletion

In the following post we will describe the plugin, scan, report and the “nessus_find_targets” generic command.


Robots.txt scanning differences between Metasploit and Nmap

Metasploit has auxiliary scanner dedicated to robots.txt files. I was interest to compare this Metasploit auxiliary scanner with Nmap robots.txt NSE script.

I decided to scan a /19 rang, how represent 8192 IP addresses with the 2 tools, compare the results and the time to do these scans.

Metasploit

By default, the Metasploit “scanner/http/robots_txt” auxiliary scanner is configured with 50 threads, you can if you want increase the number of thread  by setting the THREADS option, we have set THREADS to 256.

Metasploit, between the console, has take around 40 seconds to scan all the 8192 IP addresses, and return us 41 responses.

Example of output :

[*] [xxx.xxx.xxx.xxx] /robots.txt found
[*] [xxx.xxx.xxx.xxx] /robots.txt – /database/, /includes/, /misc/, /modules/, /sites/, /themes/, /scripts/, /updates/, /profiles/, /xmlrpc.php, /cron.php, /update.php, /install.php, /INSTALL.txt, /INSTALL.mysql.txt, /INSTALL.pgsql.txt, /CHANGELOG.txt, /MAINTAINERS.txt, /LICENSE.txt, /UPGRADE.txt, /admin/, /comment/reply/, /contact/, /logout/, /node/add/, /search/, /user/register/, /user/password/, /user/login/, /?q=admin/, /?q=comment/reply/, /?q=contact/, /?q=logout/, /?q=node/add/, /?q=search/, /?q=user/password/, /?q=user/register/, /?q=user/login/

Nmap

With Nmap, the following command will permit you to scan the robots.txt files.

time sudo nmap –script=robots.txt -p80 -PN -T4 -oN xxx.xxx.xxx.xxx_19.txt xxx.xxx.xxx.0/19

Nmap has take around 11 minutes to scan all the 8192 IP addresses, and return us 38 responses.

Example of output :

Nmap scan report for toto.sploit.com (xxx.xxx.xxx.xxx)
Host is up (0.040s latency).
PORT   STATE SERVICE
80/tcp open  http
| robots.txt: has 38 disallowed entries (15 shown)
| /database/ /includes/ /misc/ /modules/ /sites/ /themes/
| /scripts/ /updates/ /profiles/ /xmlrpc.php /cron.php /update.php
|_/install.php /INSTALL.txt /INSTALL.mysql.txt

Depending on the verbosity you give to Nmap, the complete robots.txt disallowed entries will be displayed.

In first manner we can think that Metasploit is faster than Nmap to parse all the robots.txt files. Metasploit has discover 41 robots.txt files and Nmap 38. If you take a look on the following matrices, you will see that a total of 44 robots.txt files where discovered. So 3 missed by Metasploit and 6 missed by Nmap. These missed robots.txt files are not the same between the 2 tools in most cases.

A missed robots.txt file is identified as 0 in the file, the finded one with 1. The “robots.txt” column represent the tests with a basic web browser, 1 for existing files, 0 for non existing, or accessible files.

We have case A, how is all the time missed by Nmap only. The following robots.txt entries are missed.

User-agent: *
Disallow:

An robots.txt file exist, but cause the Disallow directive don’t contain any entries, the NSE script is not matching.

We have case C, how is missed by Nmap only :

User-agent: *
Disallow: /

This case is look like case B, but Metasploit find it.

Finally we have case X, how are detected by Nmap, not detected by Metasploit, but also not accessible by a traditional web browser or wget command line. A 404 apache error code is in return but Nmap return some robots.txt entries.

HTTP Methods scanning differences between Metasploit and Nmap

Metasploit has auxiliary modules dedicated to scan HTTP methods. I was interest to compare this Metasploit module with Nmap http-methods NSE script.

I decided to scan a /24 rang, how represent 255 IP addresses with the 2 tools, compare the results and the time to do these scans.

Metasploit

By default, the Metasploit “scanner/http/options” auxiliary module is configured with 50 threads, you can if you want increase the number of thread  by setting the THREADS option, we have set THREADS to 256.

Cli testing

time sudo msfcli scanner/http/options THREADS=256 RHOSTS=xxx.xxx.xxx.xxx/24 E

Metasploit, between the cli, has take around 21 seconds to scan all the 255 IP addresses, and return us 7 responses.

Console testing

Metasploit, between the console, has take around 13 seconds to scan all the 255 IP addresses, and return us 7 responses, the same as the cli.

Example of output :

[*] xxx.xxx.xxx.xxx allows GET,HEAD,POST,OPTIONS,TRACE methods
[*] xxx.xxx.xxx.xxx allows GET,HEAD,POST,OPTIONS,TRACE methods
[*] xxx.xxx.xxx.xxx allows OPTIONS, TRACE, GET, HEAD methods
[*] xxx.xxx.xxx.xxx allows OPTIONS, TRACE, GET, HEAD methods
[*] xxx.xxx.xxx.xxx allows GET,HEAD,POST,OPTIONS,TRACE methods
[*] xxx.xxx.xxx.xxx allows OPTIONS,GET,HEAD,POST,DELETE,TRACE,PROPFIND,PROPPATCH,COPY,MOVE,LOCK,UNLOCK methods
[*] xxx.xxx.xxx.xxx allows OPTIONS, TRACE, GET, HEAD, POST methods

Nmap

With Nmap, the following command will permit you to scan the HTTP methods.

time sudo nmap –script=http-methods -PN -T4 -p 80 -oN xxx.xxx.xxx.0-255_http_methods.txt xxx.xxx.xxx.0/24

Nmap has take around 11 seconds to scan all the 255 IP addresses, and return us 7 responses. The 7 responses are the same as the Metasploit one, with the same available methods detected.

Example of output :

Nmap scan report for toto.sploit.com (xxx.xxx.xxx.xxx)
Host is up (0.11s latency).
PORT   STATE SERVICE
80/tcp open  http
| http-methods: OPTIONS GET HEAD POST DELETE TRACE PROPFIND PROPPATCH COPY MOVE LOCK UNLOCK
| Potentially risky methods: DELETE TRACE PROPFIND PROPPATCH COPY MOVE LOCK UNLOCK
|_See http://nmap.org/nsedoc/scripts/http-methods.html

In term of time of execution, Metasploit console and Nmap are equivalent, but in term of result the fact that the Nmap NSE script give references on the potential risky methods is nice advanced information included by default.