Tag Archives: ArcSight

ArcSight Cisco IOS SmartConnector installation with Dynamips and Dynagen

In my previous blob posts I have explain on how to install ArcSight Logger L750MB, how to setup a Windows Snare SmartConnector, some useful ArcSight SmartConnector commands and on how to backup your Logger configurations. This new blog post will explain you on how to setup a Cisco lab with Dynamips and Dynagen and how to setup an ArcSight Cisco IOS SmartConnector. The ArcSight Cisco IOS SmartConnector supports 2600 series and above with IOS 11.3, 12.4, 15.0, and 15.1.

Dynamips and Dynagen lab setup

First of all my lab is running under Ubuntu 10.04.2 LTS. Dynamips is a Cisco router emulator, but he can also emulate switches and Cisco PIX/ASA. Dynagen is a front-end for Dynamips. “Dynagen takes care of specifying the right port adapters, generating and matching up those pesky NIO descriptors, specifying bridges, frame-relay, ATM switches, etc. It also provides a management CLI for listing devices, suspending and reloading instances, determining and managing idle-pc values, performing packet captures, etc.”.

You have to create a “dynamics” folder into your “/opt” directory.

Download the latest Dynagen version and uncompress the archive in the “dynamips” folder. My lab Dynagen version is 0.9.1 and this specific version require at least version 0.2.8-RC1 of Dynamics. Download version 0.2.8-RC1 of Dynamics and use the “chmod 755” command to make the Dynamips binary executable.

Create symbolic links, in “/usr/sbin” for the Dynagen and Dynamips programs.

cd /usr/sbin
ln -s /opt/dynamips/dynagen-0.11.0/dynagen dynagen
ln -s /opt/dynamips/dynamips-0.2.8-RC1-x86.bin dynamips

Create a directory for Cisco IOS images.

Download you Cisco IOS images into the “images” directory. To find Cisco IOS images you can use some Google dorks.

For 7200 search with intitle:index.of c7200*.bin -site:cisco.comTry

For 3660 search with intitle:index.of c3660*.bin -site:cisco.comTry

For PIX search with intitle:index.of cisco pix*.bin -site:cisco.comTry

For my lab I have use the “c7200-adventerprisek9-mz.124-4.T1.bin” IOS image. You will maybe need to uncompress the IOS image archive.

Then create a “lab_router.net” file into “/opt/dynamips/dynagen-0.11.0/sample_labs” directory. Here under my “lab_router.net” configuration.

[localhost]
[[7200]]
ram=256
image = /opt/dynamips/images/c7200-adventerprisek9-mz.124-4.T1.bin
nep = npe-400
[[router R1]]
model = 7200
f0/0 = NIO_tap:tap0
f1/0 = NIO_gen_eth:eth0

Maybe you have to adapt your IOS image file path.

Now you have to create a TUN/TAP interface on your Linux box.

Install “uml-utilities” package.

Load the TUN/TAP driver into the kernel.

Create a TUN/TAP interface by invoking the “tunctl” command. Enable the “tap0” interface and configure an IP address for it.

Remove your existing “eth0” interface configuration with the following command.

Add a default route that points to the router interface connected to the “tap0” interface.

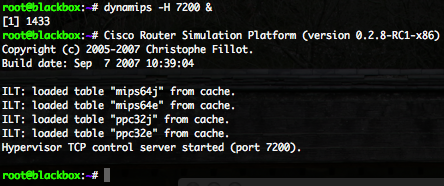
Now start the dynamics process with the following command. Not that the “&” character instruct the process to run in the background.

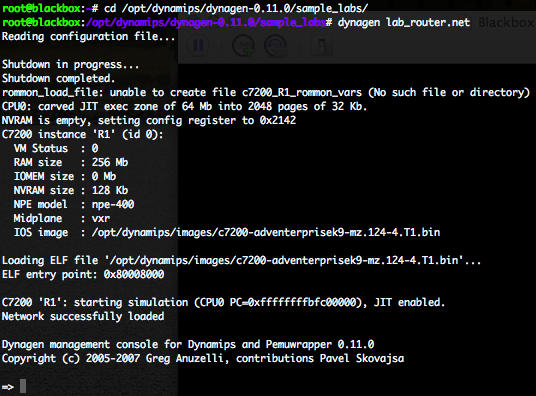
Use the “dynagen” command to process the “lab_router.net” configuration file and start the virtual network.

The Dynagen “list” command will permit you to list the network equipment and the the TCP port for console access.

Connect you with telnet on “localhost” port “2000” to get access to the router.

On the first router configuration question response “no“.

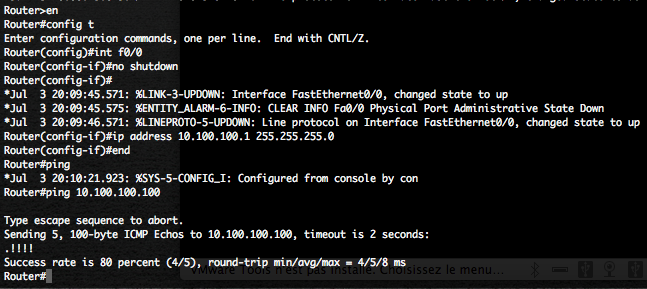
Perform the following tasks on the router, to configure the “f0/0” router interface how is mapped to the TUN/TAP “tap0” interface.

  • Enter in configuration mode.
  • Enable the “f0/0” interface
  • Provide an IP address for this interface
  • Try to ping the “tap0” interface

Now provide Cisco passwords.

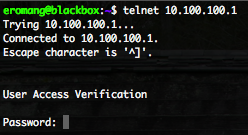
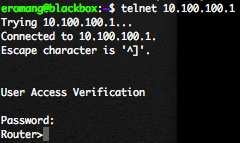
At this point you can connect you, with telnet, from the Linux box to the Cisco router directly on IP 10.100.100.1.

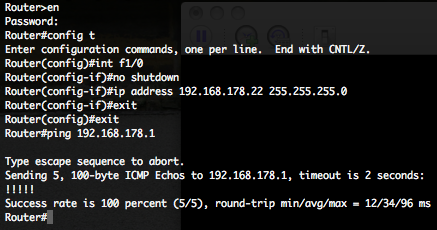
Perform the following tasks on the router, to finish our router configuration to have the possibility to communicate with external world.

  • Enter in configuration mode.
  • Enable the “f1/0” interface
  • Provide an IP address for this interface, here 192.168.178.22.
  • Try to ping the default gateway for 192.168.178.0/24 network, here 192.168.178.1.

Your Cisco router is now able to communicate with outside world.

ArcSight Cisco IOS SmartConnector installation and setup

If you have an existing Syslog UDP daemon, for example the SmartConnector configured in the Snare Windows blog post, you don’t need to follow the installation and setup. ArcSight Cisco IOS SmartConnector is considered as a “sub connector” for Syslog SmartConnector. All Cisco IOS messages how will be received by the Syslog UDP daemon are recognized coming from a Cisco IOS, but the same Syslog UDP daemon can also receive Windows Snare, Snort, Juniper NSM, JunOS, Red Hat Linux Audit messages. Cisco IOS Syslog message will be converted into SmartMessage (CEF) format.

First verify that you don’t have any existing Syslog UDP daemon how is running on the box, you can use “netstat -uan” to verify this.

Upload the “ArcSight-5.0.2.5703.0-Connector-Downloadable-Logger-Linux.bin” binary available from the ArcSight Download Center, and use the “chmod 755” command to make the binary executable.

Execute the binary in order to install the SmartConnector.

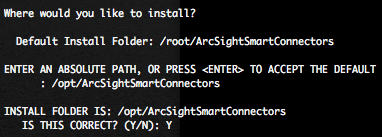
Press “Enter” twice times, provide the installation directory, in our case “/opt/ArcSightSmartConnectors” and confirm the installation.

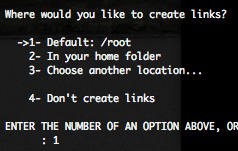
We recommend you to create a links in order to remove the SmartConnector.

Once the SmartConnector installed you need to configure him.

Select the destination type that you want to configure for this SmartConnector, in our case it will be the L750MB Logger.

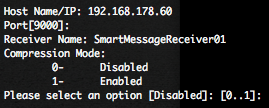
Provide the hostname or IP address of the Logger, the destination port (for Logger software version the port is 9000/TCP), and the Receiver Name (available in the Configuration -> Event Input / Output menu of the Logger).

Select “Syslog Daemon(syslog)” as SmartConnector to install, don’t change the network IP, port and protocol (514/UDP).

Provide a SmartConnector name, don’t forget that the SmartConnector could also receive Syslog messages from other devices than Cisco IOS.

Select if you want to install the SmartConnector as a service or as a standalone application, in our case we will stay in standalone mode.

Now you have to start the SmartConnector by executing the following commands.

The SmartConnector is waiting for messages and is running (ET=Up, HT=Up).

Configure Cisco IOS for event collection

Log again on the Cisco router with telnet.

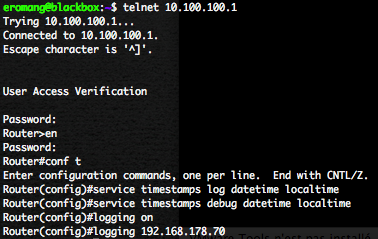
Execute the following steps to enable Cisco IOS event collection.

  • Enter in enable mode.
  • Enter in configuration mode.
  • Enable Time-Stamps on Log Message
  • Enable System Message Loggin
  • Set the Syslog Destination, in our case the Syslog UDP daemon SmartConnector.

In your ArcSight SmartConnector console, you will see that the first Cisco vendor and CiscoRouter product message has been received by the SmartConnector.

Also if you check the “/opt/ArcSightSmartConnectors/current/logs/agent.log” log file, you will see these messages.

[2011-07-03 21:20:33,717][INFO ][default.com.arcsight.agent.loadable._EventCounter][processSingleAlert] First event from [CISCO|CiscoRouter||192.168.178.22] received.

[2011-07-03 21:20:38,033][INFO ][default.com.arcsight.common.eb.a][processSingleAlert] Succesfully loaded categorization file [cisco/ciscorouter_xr.csv]

[2011-07-03 21:20:45,419][INFO ][default.com.arcsight.agent.loadable._DeviceEventCounter][processSingleAlert] New device found [|192.168.178.22|CISCO|CiscoRouter]. Starting counters.

In your Logger you will see all Cisco events.
ArcSight Logger configuration backup and restoration

With your ArcSight Logger L750MB you have maybe create some particular settings, some groups with associated users, filters, saved searches, customized report queries, report templates and dashboards. It is important to have regulate backups of all these stuffs. This blog post, will explain you on how to setup “One time only” and “Scheduled” backup of your ArcSight Logger configuration.

An important thing to know is that “Configuration Backup don’t include backup of the received events.

Configuration Backup” can only be made on a different host than the Logger and only by SSH SCP. So you will need to have a system user on a server how has a valid SSH connexion, also you will need to create a folder in this user home directory in order to receive the “tar.gz” backup file. In our example this folder will be named “backup“.

One time only” or “Scheduled” configuration backup

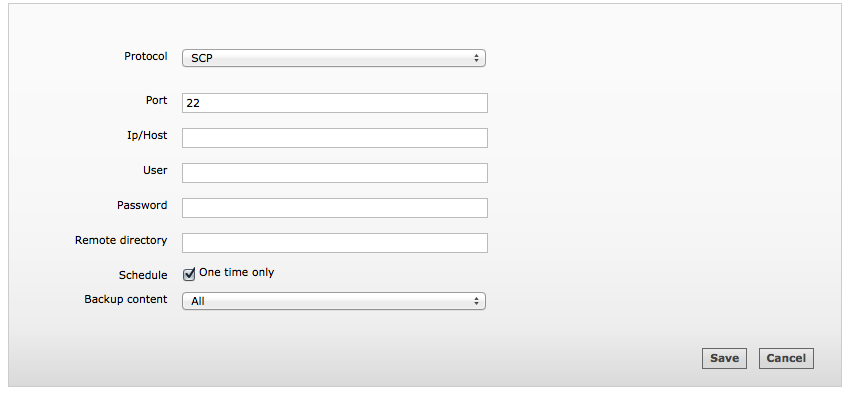
To configure an “One time only” or a “Scheduled” backup you will to log in the Logger Web administration and go in the “Configuration -> Configuration Backup” menu.

Edit the existing “Configuration backup” entry by clicking on the edit button and complete the fields.

Port : The port on which the SSH server is listening (by default 22)
IP/Host : IP address or host name of the SSH server.
User : The remote SSH user.
Password : The remote SSH password
Remote directory : The remote directory how the backup will be deposited.
Schedule : For “One time only” backup, let the check box be checked. For “Scheduled” backup, choose “Everyday” or “Days of Week” (Example : Su, M, T, W, Th, F, Sa), and “Hour of day” (in 24 hour format, example : 1, 4, 7, 12, 23), or “Every Hours” (in 24 hour format, example : 1, 4, 7, 12, 23) or “Every Minutes” (Example : 15, 20, 30, 59). For the “Every Minutes” setting you can not a value less than 15 minutes.

Backup content :All” for all the configurations or “Report Content only” for reports, queries, parameters, dashboards and templates.

Then click on “Save” button to save your “Configuration Backup” settings.

To start the backup click twice on the extreme right icon of the “Configuration Backup” Web page. One time to deactivate the backup and one other time to reactivate the backup. If you don’t do this, the backup will not be done.


One the remote server, in the “$HOME_SSH_USER/backup” directory, you will see  a file with a unique name (ex : 26Jun11_183551.configs.tar.gz).

Scheduled “Configuration Backup” specificities

Scheduled “Configuration Backup” appear in the “Scheduled Tasks” page, accessible from the “Configuration” menu.

You can, from this page, edit the “Configuration Backup” settings, delete the “Configuration Backup“, enable or disable the schedule of the “Configuration Backup“.

Also, you can verify that the “Configuration Backup” has occur successfully by verifying the “Finished Tasks“.

If your scheduled “Configuration Backup” has not occur successfully you can also find all the outputs in the “Finished Tasks”.

Another way to check the scheduled tasks results is to read the “$ARCSIGHT_HOME/current/arcsight/logger/logs/logger_server.out.log” file. For people how have an Logger appliance you can download the logs files from the “Configuration -> Retrieve Logs” menu.

Unfortunately they are no CEF event generated when a scheduled task has occur successfully or failed. So no way to have a clear view on scheduled tasks activities.

“Configuration Backup” restoration

When you restore your “Configuration Backup” all existing content are not preserved and deleted, also you can only restore a “Configuration Backup” from the same operating system and version of Logger.

To restore your backup, you only have to log in the Logger Web administration and go in the “Configuration -> Configuration Backup” menu. Then click on the “Restore” button and upload your configuration backup. Once the “Configuration Backup” is restored the Logger will reboot. So plan your restore 🙂

ArcSight Logger and SmartConnectors Questions and Answers

I receive questions about ArcSight Logger and SmartConnectors, you will find here under some answers. I will add more questions and answers in future. Don’t hesitate to add your questions as comments on this blog post.

Is ArcSight Logger L750MB still free for download ?

ArcSight Logger L750MB is now for free, since 17 August. You don’t have to pay 49$ per year any more.

Is ArcSight Logger L750MB available as ISO or virtual appliance ?

ArcSight Logger L750MB is not provided as ISO or as virtual appliance (VMWare image, Xen, VirtualBox, KVM, etc.). The Logger is available as a binary file how will install the software on an existing operating system.

Where can I find an ArcSight Logger demo ?

ArcSight has publish a Logger demonstration video on YouTube.

Where can I find an ArcSight SmartConnector list ?

For Logger L750MB, you can find all the supported products list in my previous blog post. For a complete list of ArcSight SmartConnector supported products, a PDF is available on ArcSight web site.

Where can I download CEF (Common Event Format) specifications ?

ArcSight doesn’t provide direct access to the CEF open log management standard. You have to contact ArcSight through this Web page.

What are Logger and SmartConnector default ports ?

For ArcSight Logger it is depending if you have acquire a software or appliance version. If you have a software version, the default port will be 9000/TCP to access to the Logger Web interface and to configure the destination port of your SmartConnector. If you have an appliance version, the default port will be 443/TCP to to the Logger Web interface and to configure the destination port of your SmartConnector.

For ArcSight ESM, all communication are done on port 8443/TCP by default.

What is ArcSight Logger administration default URL ?

Default administration URL is https://$LOGGER:9000 for a software version, or https://$LOGGER:443 for an appliance version. Replace the $LOGGER variable with the hostname or IP address of your Logger.

What are ArcSight Logger default login and password ?

ArcSight Logger default login and password are “admin” / “password” 🙂

How many Storage Groups are available in ArcSight Logger ?

ArcSight Logger propose 6 Storage Groups, one of them is reserved for internal activities and one will be created by default. You have to create the 4 others Storage Groups during the Logger setup, after the installation you will no more able to create additional Storage Groups.

Do an ArcSight SmartConnector require a server ?

Depending on your architecture, you will require or not a server to host an ArcSight SmartConnector.

Cases you don’t need a server to host a SmartConnector :

  • You have a L3x00 serie Logger. These Logger series have an embedded SmartConnector appliance, so you will be able to manage embedded SmartConnectors and a certain number of remote SmartConnectors directly from the Logger.
  • You have a SmartConnector appliance. SmartConnector appliances are able to manage a certain number of embedded SmartConnectors, so you will be able to manage embedded SmartConnectors and a certain number of remote SmartConnectors directly from the Logger.
Cases you will need a server to host a SmartConnector :
  • You have a software Logger (L750MB or L5GB). Software Logger doesn’t provide any embedded SmartConnector appliance, you will not be able to manage remote SmartConnectors through the Logger.
  • You have a L7x00 serie Logger. These Logger series doesn’t provide any embedded SmartConnector appliance, you will not be able to manage remote SmartConnectors through the Logger.
  • You have ArcSight ESM. ESM don’t provide any embedded SmartConnectors, but you will able to manage remote SmartConnectors.

ArcSight SmartConnector Custom Zones Mapping

Once you have install and configure your SYSLOG ArcSight SmartConnector to communicate with your free L750MB Logger, you can customize “zones mapping” for all devices how will communicate with the SmartConnector. In CEF (Common Event Format) standard, the device zone is classified under “deviceZoneURI” and the SmartConnector zone is classified under “agentZoneURI“.

A zone represent a part of your network with contiguous IP addresses, for example LAN, DMZ, VPN, WIFI. If you customize your devices “zones mapping“, you will able to create, with your Logger, alerts, queries and reports for group of devices how are in the same zone. This will save you time 🙂

An ArcSight SmartConnector zone is represented by :

  • A starting IP address (for example : 192.168.0.15)
  • A ending IP address (for example : 192.168.0.20)
  • A zone name (for example : /All Zones/Office Zones/Printers)

The zone will be represented by this uncommented line :

192.168.0.15,192.168.0.20,/All Zones/Office Zones/Printers

In order to customize your devices “zones mapping“, you only have edit the “defaultzones.csv” file located in “$ARCSIGHT_HOME/current/user/agent/acp/” directory.

Delete the following line from the file :

#ignore.this.file <- delete this line

Then add your zones mapping, save the file and restart the SmartConnector.